· What are the most common installation issues?
(Entry last updated on November 24th, 2004)Installing the Rio Car player shouldn't be any more troublesome than installing any other aftermarket stereo. Any professional car stereo installer should be able to handle the job quitre easily.
With that said, here are some common issues. Note that these are (for the most part) not specific to the Rio Car player. You could easily run into the same problems installing a Sony CD player, for example.
Separate Amplifier:
The player doesn't have any built-in amplification. It requires an outboard amp. This actually a good thing- all of the best high-end car stereo installations use separate amplifiers. But it does make it something more complicated than just a 10-minute "plug the new radio into the dash" installation.
The player should be treated as a high-end car stereo in this respect. If you're not comfortable with running cables to the car's trunk and installing an amplifier, then you should consider having a professional installer do the job.
You might already have a separate amplifier installed, whether it is an aftermarket amplifier or part of your car's factory stereo system. In that case, the player will be fairly simple to install in place of the existing stereo. For factory systems, there are interfaces available which will allow you to plug it directly into the factory amplifer. An example of just such an installation is here.
Ground loop noise and alternator whine:
This is not specific to the Rio Car player. Any car stereo can suffer from this unless the components are carefully grounded. This is a normal troubleshooting procedure for any professional car stereo shop. If there is noise in your installation, the steps to solve the problem are:
- Understand the nature of what ground loops are. The anatomy of a ground loop can be found here.
- Make sure all devices (amps, crossovers, head unit, etc.) all have the same potential to ground.
- Make sure the ground is good and solid, and uses heavy-gauge cable.
- Make the ground wire runs as short as possible.
- Make sure you have used the proper ground points. Tips here.
- Make sure the devices aren't grounding in unexpected places, such as through the chassis or the RCA cable shrouds.
- Filter the power feeds properly.
- Properly tune the input gains on the amplifiers so that you're not unnecessarily amplifying noise (detailed in the next section).
- Route the audio cables separately from the power cables to prevent inductive and RF noise.
- Double-check all connections, especially power connections. Make sure all wiring splices, crimps, and solder joints are completely solid.
- Check your sled's docking connector to make sure
it doesn't have this problem.
- Try attaching a ground wire between the docking sled itself and a solid ground point on the car's frame.
- If the noise is on the Aux input only, try grounding the sleeves of the Aux input connections.
- Check to see if your player has the EMC capacitors fitted, and if so, remove them.
Here are three excellent documents describing in great detail how to troubleshoot noise:
http://www.installdr.com/TechDocs/999501.pdf
http://www.installdr.com/TechDocs/999502.pdf
http://www.audiocontrol.com/techpapers/tech1002.pdf
Crutchfield has a graphical flowchart for diagnosing noise here. Autoaudio.com also has an engine noise troubleshooter here.
Also, it's possible that a cheaply-made amplifier might cause ground loop noise and/or alternator whine. If sound quality is important to you (and ground loop noise can be defined as a sound quality problem), always consider purchasing high quality amplification and speakers.
Something as simple as a low fluid level in your battery can also cause alternator whine.
There are also noise suppressor devices that can be fitted directly to the alternator output wire in your engine compartment. These differ from the standard kind of noise suppressors in that they go directly after the alternator and reduce noise globally for your entire electrical system (most noise suppressors only go on the wires that run to the head unit). These suppressors can be obtained from stereo installer shops, or via mail order from places such as Crutchfield.
Properly adjust the input gain level on the amplifier(s):
All car stereos that use separate amplifiers should go through this procedure. If you car has multiple amplifiers, perform this procedure separately for each amp with the other(s) disconnected.
- Turn the amplifier's input gain all the way down to zero.
- Turn the player all the way up to 0db (but not overdriven past 0db).
- Set the player's equalizer to flat (0db) and the loudness off.
- Play a loud (but sonically clean) piece of music on the player.
- Slowly turn up the input gain on the amplifier. Increase the gain until either a) you hear distortion coming from the amp or speakers, or b) the amp is playing as loud as you'd ever want it to under normal listening conditions.
- The amp is now playing at its maximum signal-to-noise ratio. Now turn the player back down before you hurt your ears.
In real life, this isn't necessarily the final level you'll leave the amp gain set to. In practice, you'll probably set it lower than this. For instance, if you want to reduce the amp's noise floor even farther, or if you need to balance the levels of multiple amplifiers so that they are similar in volume.
Is the Rio Car going to be your only stereo?
Since the player has line-level inputs and outputs, you can (if desired) hook it up to a regular CD player. If you want to do this, you need space in your dashboard for two full DIN-sized stereos (the Rio Car player and the CD player). Also, depending on how you hook it up, you'll need either line-level auxiliary inputs or line-level outputs on the CD player.
Personally, I don't miss my CD player one bit. I'm perfectly happy with the empeg as my only stereo. But some people don't want to give up their CD players, so the option is there if you really want it.
If you decide to go the two-stereo route, your choice will be: which stereo will come first in the audio daisy chain? A complete discussion of this question can be found as its own separate entry in this FAQ.
And if your dash only has room for one DIN-sized stereo, you're not completely out of luck. Simply run a pair of audio extension cables from the player's aux-in connectors and leave them somewhere reasonably easy to reach. Use these to connect to a portable CD player (for instance, one kept in the glove compartment). For the rare instances when you need to play an actual CD (and trust me, it will be rare), this will do just fine.
Are you trying to add the Rio Car to a factory stereo?
If you are adding the player to an existing factory sound system (assuming you have space in the dash for both units), it may require special adapters. This is a very common problem, and it would be the same if you were trying to add, say, a minidisc player or something.
You would probably need one of the following kinds of adapters, depending on the system and how you want it connected:
- Keep the factory system, and adapt the factory system's CD changer input to accept line-level inputs as if they were from a CD changer. This may require a special module which "tricks" the factory stereo into thinking it's got a factory CD changer attached. Such adapters can be found at www.peripheral-aamp.com, www.blitzsafe.com, and www.rcainput.com. This option is complicated, since the factory systems are designed to make such additions difficult-- they want you to buy the factory CD changer from the dealership instead. And most of the aftermarket CD changer adapters only accept certain brands of CD changers, not generic line-level devices. Even if you can get it working this way, note that it doesn't allow you to control the player from the factory stereo's front panel, so this isn't a way to trunk mount the player. And in some cases, the adapters will only work if an actual CD changer is plugged into them.
- Keep the factory system, and use an "FM Modulator" to have the line level signal inserted into the radio's antenna input. Clarion makes a generic one (part number FM100S) that retails for about $60.00 US.
- If your factory system has a separate amplifier, such as in certain Bose systems, Chrysler-Infinity systems, or certain other "premium sound package" systems, you could adapt the factory amp to accept line-level inputs. These adapters are common, but are often specific to your make and model of vehicle. At that point, you could choose to have the Rio Car as your only stereo, or you could also use another adapter (usually a speaker-to-line-level converter) to connect the factory stereo's outputs the player's auxiliary inputs. An example of such an interface is the Pacific Accessory Corporation OEM-1 interface. An installation using the OEM-1 can be seen here.
In all cases, your stereo installation shop should have access to the necessary parts to get the job done. Some vehicles will be more difficult to adapt than others, make sure to have your installer check out your vehicle ahead of time before committing to anything. Finally, remember that you can almost always simply remove the factory stereo completely and use the player as your only stereo. You probably won't miss the original stereo one bit.
ISO Wiring connector confusion:
Most aftermarket car stereos require a special wiring harness adapter which allows the installer to connect the stereo without cutting your car's wires. On one end, it has a snap-in connector which matches your make/model of car. The other end is dangling wires that the installer solders to your new stereo. This wiring harness is readily available to professional installers. It is normally soldered to the stereo and used as follows:
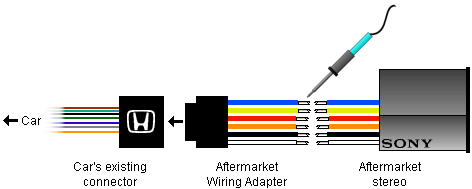
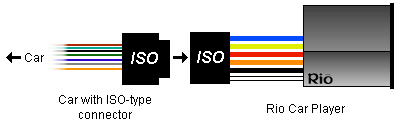
This will work with the Rio Car player, too. However, the Rio Car player goes a step further, in that it doesn't just have dangling bare wires. It also has a snap-in connector just in case your car happens to be one of the models with an ISO connector plug. In those models of car, you don't even need to solder the player's wires, because the plugs just snap together. Like this:
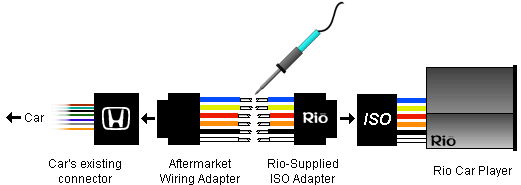
In case your car doesn't have an ISO connector, the Rio Car player ships with its own ISO wiring adapter . If your car doesn't have an ISO connector, you can either cut the connector off of the player and solder it like any other car stereo, or you can use the Rio-supplied ISO adapter combined with an aftermarket adapter. If you use the Rio-supplied adapter, the connections will go like this:
Reversed ISO wires:
There's just one problem with the whole ISO connector thing. If you own a VW or Audi, these cars have a standard ISO connector. But they have reversed two of the wires. They swap the constant power wire and the ignition-switched power wire. You will need to either cut/solder the wires or alter the connector pinouts in these vehicles.
One symptom of this problem is that the player won't enter standby mode when you shut off the ignition.
Note: It has been revealed that recent VWs might have more than just the two power wires switched. For instance, the blue wire on the player's ISO connector might correspond to a 12v power source on the VW connector. This can cause all sorts of strange problems, such as causing the player's standby light to glow steadily 100 percent of the time.
So if you have a VW, you should definitely use an aftermarket harness adapter instead of the ISO plug. Either that or learn its pinouts and swap the wires on your ISO connector accordingly.
Negative spike bug:
A minor problem was discovered after the shipment of the initial batch of Mark 2 players: Some cars produce a large negative spike on the ignition wire instead of just going to zero voltage when you shut off the ignition. This unexpected behavior confuses the player's power control circuitry, causing strange behavior when you shut off the ignition.
The symptoms of this problem include the unit forgetting its song position and/or going straight into full-power-off mode (rather than sleep mode) when you shut off the ignition. You might also get a loud power-down "thump" from your amplifier.
Click here for more information and solutions.
DIN bay size:
The player is a standard sized Euro-DIN stereo. This is the exact same size as all the other aftermarket stereos on the market. If your car accepts a DIN-sized radio, great. If it doesn't, your installer will have a mounting kit which adapts your car so that it does accept a DIN-sized radio.
The only problem is that the player is a pullout, a style which other stereo companies quit making several years ago. Most cars will accept a pullout radio just fine. Some cars, however, put a piece of fascia trim around the radio which is smaller than the radio itself. Such cars won't accept a pullout radio unless you cut the fascia or find some other alternative.
Doug Morrison came up with a novel solution for this problem when he installed his player into his Toyota. A description, and pictures of his installation, can be found here.
Tuner module and microphone connectors:
The radio tuner is an add-on module, a small box that installs inside the dashboard behind the player. This connects to the small white connector dangling behind the sled. If you're installing the player without the tuner, you will need to dismantle the dashboard if you want to add the tuner at a later date.
There is also a microphone input (small round black connector) on the back of the sled. This may be used in the future for special software features such as voice recognition or automatic volume control. If you wish to use this connector at a later date, you'll need to dismantle the dashboard to reach it.
|